
Vegetables
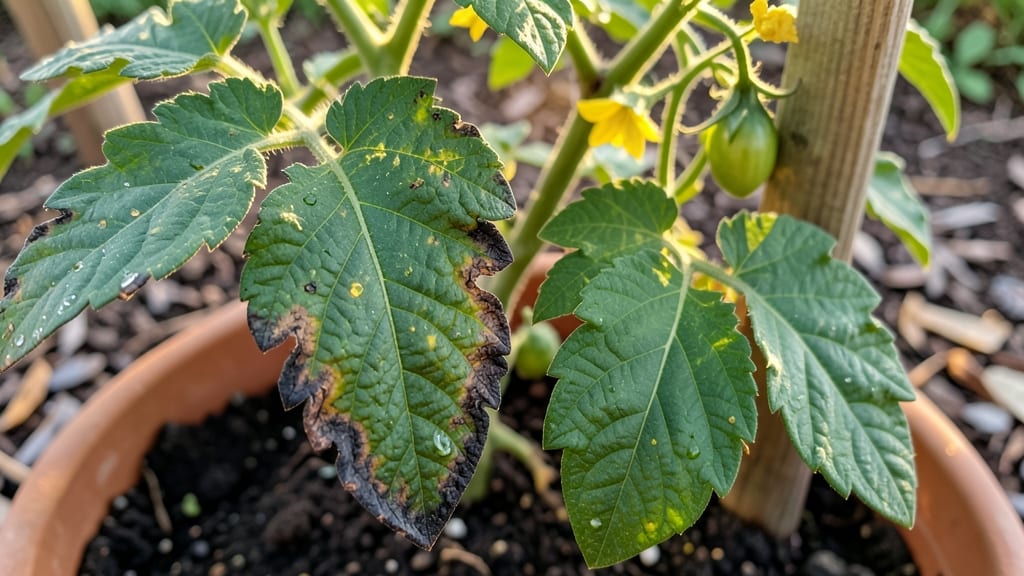
My tomatoes looked like they’d been singed by a summer sun—brown, crispy edges on leaves that should’ve been vibrant green. 🌿 That’s tomato leaf scorch, and it’s not just ugly—it weakens your plants and slashes yields. The good news?
Most cases aren’t hopeless, and prevention is simpler than you think. The culprits are usually fungal infections (like bacterial spot) or environmental stress from uneven watering, poor airflow, or heat spikes.
I’ve seen scorch turn a thriving plant into a sad, stunted mess—but with the right fixes (pruning, fungicides, and smart watering), you can bring those vines back to life. Even better, you can stop it before it starts.
By the end of this, you’ll know exactly how to spot early signs, which treatments work fastest, and how to adjust your garden routine to keep leaves lush and healthy all season. No more guessing—just actionable steps that actually work.
The key is acting fast when you see those first brown edges. Whether it’s adjusting your watering schedule or adding mulch for moisture control, small changes make a big difference. Let’s get those tomatoes thriving again!
📚 In This Guide
- What you need
- Instructions
- Tips and common mistakes
- Wrapping up and next steps
What you need
- ● Diagnostic Tools: Hand lens or magnifying glass (for close inspection of leaf edges)
- ○ pH testing kit (soil and water, optional but helpful)
- ● Moisture meter (to check soil hydration levels)
- ● Prevention & Treatment Supplies: Organic mulch (straw, wood chips, or shredded leaves, 2–3 inches)
- ● Slow-release fertilizer (balanced 10-10-10 or organic options like compost tea)
- ● Drip irrigation system or soaker hoses (to avoid overhead watering)
- ● Shade cloth (30–50% coverage for hot climates, 5–10 sq ft per plant)
- ○ Copper fungicide spray (optional for severe cases, follow label instructions)
- ● Safety Gear: Gloves (nitrile or rubber, for handling plants and chemicals)
- ● Goggles (if using sprays or working in dusty conditions)
- ● Know your USDA Hardiness Zone (cool-season tomatoes thrive in Zones 3–10).
- ● Check local weather forecasts for heatwaves or drought warnings.
- ● Ensure your tomatoes are well-established (4–6 weeks old) before heavy intervention.
- ● Pro tip: If your soil is sandy or fast-draining, add 1–2 inches of compost 2 weeks before planting.
Step-by-Step guide to preventing tomato leaf scorch
Here’s how I keep my tomato plants thriving when temperatures drop—no crispy edges in sight.
🌿 Step 1: Adjust Watering for Early Morning Consistency
Tomato leaf scorch thrives on uneven moisture, so I water deeply every morning at the same time. Use 1-2 gallons per plant, letting the water soak into the soil until it reaches 6-8 inches deep. You’ll know it’s right when the top inch of soil feels damp but not soggy. Avoid evening watering—wet leaves overnight invite fungal infections that worsen scorch symptoms.
I test moisture by sticking my finger 2 inches into the soil; if it’s dry, water again. Mulch with 2-3 inches of straw or shredded leaves right after watering to lock in moisture and keep roots cool. This prevents the soil from drying out too quickly, which is the #1 trigger for scorch.
☀️ Step 2: Provide Afternoon Shade During Heat Spikes
When temperatures hit 85°F or higher, I shield my tomato plants with 30-50% shade cloth from 11 AM to 4 PM. You’ll see the difference immediately—the leaves stay a vibrant green instead of developing those telltale brown, papery edges. If you don’t have shade cloth, use a lightweight row cover or even a sheet draped loosely over stakes.
Remove the shade by late afternoon to let the plants bask in 4-6 hours of direct sunlight for photosynthesis. I always check the forecast first—if a heatwave’s coming, I start shading a day early. Prune any lower leaves that brush against the soil to improve airflow and reduce stress.
💧 Step 3: Boost Soil Moisture Retention with Organic Amendments
I mix 2-3 inches of compost into the top 6 inches of soil before planting to improve water retention. Compost holds moisture like a sponge while feeding the roots. For container-grown tomatoes, I blend 1 part compost with 3 parts potting mix to keep the soil loose but hydrated.
Every 2-3 weeks, I top-dress with ½ cup of well-aged compost around the base of the plant (not touching the stem). This adds organic matter that breaks down slowly, releasing moisture gradually. You’ll notice the soil stays darker and richer—this is your sign the amendments are working.
✂️ Step 4: Prune Strategically to Reduce Stress
Remove any leaves showing early scorch symptoms immediately—they won’t recover, and the plant wastes energy trying. Use clean, sharp pruners to cut ¼ inch above a leaf node where new growth can sprout. I also prune suckers (those little shoots in the leaf axils) to focus the plant’s energy on fruit production rather than foliage.
Thin out crowded branches to improve airflow—aim for 18-24 inches between stems. You’ll see stronger, sturdier vines that handle temperature swings better. Avoid pruning during the hottest part of the day; wait until morning when the plant is hydrated and less stressed.
🌱 Step 5: Monitor and Adjust for Long-Term Prevention
Check your plants daily during heatwaves for early signs of scorch: yellowing at the leaf edges or a slight wilting. If you catch it early, a deep watering and a few hours of afternoon shade can reverse the damage. Keep a garden journal to track when scorch appears—you’ll spot patterns like after a dry spell or sudden heat spike.
In late summer, I switch to drip irrigation to deliver water directly to the roots, avoiding leaf wetness. If scorch persists, test your soil pH—tomatoes prefer 6.2-6.8. Amend with sulfur if it’s too alkaline, as nutrient uptake suffers in high-pH soil, making plants more susceptible to stress.
Tips & tricks for preventing tomato leaf scorch
Real talk: I’ve watched tomato plants go from lush and green to crispy-edged disasters in just a few days. These tricks will help you keep your plants thriving even when temperatures dip.
Morning Watering Timing: The key to Step 1’s deep watering is consistency—set a reminder for the same time every morning. If you’re watering at 7 AM, the soil will have time to absorb moisture before the heat of the day. I’ve found that using a watering wand with a gentle spray helps distribute water evenly without compacting the soil. This prevents surface drying, which is what causes those ugly brown edges.
Shade Cloth Substitutes: In Step 2, if you don’t have shade cloth, try using white bedsheets or cheesecloth draped loosely over stakes. These materials still block enough sunlight to protect leaves while allowing airflow. I’ve even used white plastic milk jugs with the bottoms cut out as individual plant shields during extreme heat—it’s a game-changer for container tomatoes.
Soil Moisture Test: When checking soil moisture in Step 1 or Step 3, press your finger 2 inches deep—this is where the roots are actively growing. If it feels dry at this depth, water immediately. I’ve noticed that sandy soils dry out faster than loamy soils, so in these cases, I water 1 gallon per plant instead of the standard 1-2 gallons to avoid over-saturating.
Pruning for Airflow: In Step 4, when pruning suckers, leave 2-3 main stems for determinate varieties and 1-2 main stems for indeterminate varieties. This balance ensures good airflow while maintaining fruit production. I’ve learned that pruning in the morning gives plants time to recover before evening temperatures drop, reducing stress.
Pro Tips for Tomato Leaf Scorch
- Real talk: I’ve watched tomato plants go from lush and green to crispy-edged disasters in just a few days. These tric...
- Morning Watering Timing: The key to Step 1’s deep watering is consistency—set a reminder for the same time every morn...
- Shade Cloth Substitutes: In Step 2, if you don’t have shade cloth, try using white bedsheets or cheesecloth draped lo...
Frequently asked questions
Got questions about tomato leaf scorch? You’re not alone!
Here are answers to the most common concerns—from early signs to long-term fixes—so you can keep your tomato plants thriving all season long.
What does tomato leaf scorch look like, and how do I tell it apart from other issues?
Tomato leaf scorch starts as crispy, brown edges on older leaves, spreading inward like a sunburn. Unlike fungal spots (which are fuzzy or moldy) or nutrient deficiencies (yellowing between veins), scorch leaves stay dry and papery. Check the undersides—if they’re brown but not wet, it’s likely scorch!
How quickly does tomato leaf scorch spread, and can I save my plants?
Scorch progresses fast in hot, dry weather—days to weeks—but early action helps! Prune affected leaves immediately, mulch to retain moisture, and water deeply at the roots (not overhead). If caught early, plants often rebound. For severe cases, shade cloth or afternoon watering can buy time until cooler weather returns.
Is tomato leaf scorch the same as heat stress? What’s the difference?
Both cause browning, but heat stress wilts leaves first (they droop before crisping), while scorch starts with dry, brittle edges. Heat stress is temporary (eases with cooler temps), but scorch is permanent damage from water loss + high temps. Think of it as a sunburn—once it’s there, it’s there!
Can I prevent tomato leaf scorch in future seasons? What’s the best long-term fix?
Yes! Plant heat-tolerant varieties like ‘Heatmaster’ or ‘Solar Fire’, and use mulch (straw or black plastic) to keep roots cool. Drip irrigation (early morning) beats overhead watering. For containers, choose self-watering pots or move plants to partial shade during peak heat. Pro tip: Avoid fertilizing during heatwaves—it stresses plants further!
Will tomato leaf scorch ruin my harvest? Can I still eat the tomatoes?
Scorched leaves won’t harm tomatoes already on the vine—they’re safe to eat! Focus on protecting new growth. However, if most leaves are damaged, the plant may struggle to produce. Harvest ripe fruit early, prune aggressively, and give it extra care. Quality over quantity!
Wrapping up and next steps
Tomato leaf scorch doesn’t have to be a dealbreaker for your garden—with the right tools, timing, and techniques, you can keep your plants thriving even in cooler seasons! 🌱 By staying proactive with Xanthomonas perforans management, proper spacing, and smart watering, you’ll be well on your way to a bountiful harvest. Now’s the perfect time to put your plan into action!
Start by revisiting your supplies (if needed) and double-checking those FAQs for any lingering questions. Then, roll up your sleeves and give your tomatoes the care they deserve—your future salads will thank you! 🍅✨